So, what's green and rhymes with "shot"? Well, "Grot," of course!
I've been prepping a squadron of Grot Tanks the last couple weeks and will be working on them one at a time alongside my Cawdor gang.


Through some combination of camaraderie toward underdogs and being enthralled by the wacky nature of Gretchin, I've always been a big fan of the Orks' short-statured brethren.
This tetrad of tanks will form the core of a 750-point all-Grot army, which will also include a few Kans and a couple blobs of Gretchin infantry. It's not going to win any tournaments, but the force should be a lot of fun and a good challenge.
I haven't gotten my hands on Imperial Armour Vol. Eight yet, but I hear it covers Grot Tanks. I also hear that like other tanks in the 40K universe, there's an option for a pintle-mounted weapon. The Grot Tank models don't come with those, so I thought it would be cool to add them.
So, I grabbed a spare shoota from the bits bin and got started:

Next, I used some Instant Mold to make a copy of an orky grip:

I also constructed a pintle to mount the shoota to with some 1-mm-thick plasticard as a base, and 0.25-mm-thick plasticard and rivets to add visual interest:

The pintle is mounted into a rectangular hole I cut into the turret to provide a stable footing. With the addition of some green stuff molded to look like weld marks, it'll be hard to tell it wasn't original after the paint goes on:


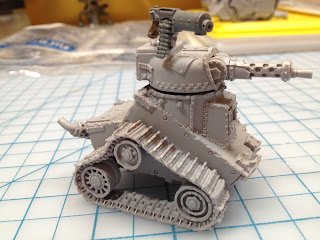
And here's the first tank prepped and ready for the spray booth (Note: The big shoota is attached for reference. I'm magnetizing the main weapons so I can switch between grotzookas and big shootas, and am currently working on building them):


Next up: My second batch of Cawdor models get a basecoat and some shading.
So, until next time, keep painting!

I've been prepping a squadron of Grot Tanks the last couple weeks and will be working on them one at a time alongside my Cawdor gang.


Through some combination of camaraderie toward underdogs and being enthralled by the wacky nature of Gretchin, I've always been a big fan of the Orks' short-statured brethren.
This tetrad of tanks will form the core of a 750-point all-Grot army, which will also include a few Kans and a couple blobs of Gretchin infantry. It's not going to win any tournaments, but the force should be a lot of fun and a good challenge.
I haven't gotten my hands on Imperial Armour Vol. Eight yet, but I hear it covers Grot Tanks. I also hear that like other tanks in the 40K universe, there's an option for a pintle-mounted weapon. The Grot Tank models don't come with those, so I thought it would be cool to add them.
So, I grabbed a spare shoota from the bits bin and got started:

Next, I used some Instant Mold to make a copy of an orky grip:

I also constructed a pintle to mount the shoota to with some 1-mm-thick plasticard as a base, and 0.25-mm-thick plasticard and rivets to add visual interest:

The pintle is mounted into a rectangular hole I cut into the turret to provide a stable footing. With the addition of some green stuff molded to look like weld marks, it'll be hard to tell it wasn't original after the paint goes on:


And here's the first tank prepped and ready for the spray booth (Note: The big shoota is attached for reference. I'm magnetizing the main weapons so I can switch between grotzookas and big shootas, and am currently working on building them):


Next up: My second batch of Cawdor models get a basecoat and some shading.
So, until next time, keep painting!


